Unity Help
All examples in class use Unity 6000.3.11f1 (LTS: Long Term Support release).
Download & installation
Unity version
Use Unity 6000.3.11f1 (an LTS, Long Term Support, release). All examples in class are based on it, so installing exactly this version avoids surprises.
Download and install
Go to the Unity 6000.3.11f1 release page ↗ and click Install to install it through Unity Hub. Other versions are in the Unity download archive ↗. In China, use the 6000.3.11f1 page on unity.cn ↗ instead, and install the same version.
Modules to install
⌨IDE
I'll be using Visual Studio Code (VSC). You're free to use any IDE you like. Unity's default, Microsoft Visual Studio Community, also works very well.
🌐WebGL Build Support
Required: Part 2 of this class, including playtesting, is based on WebGL builds.
⊞Windows Build Support
Mac users: please also install this so you can build a PC EXE that the TA can run for your assignment submissions.
📖Documentation
I'd advise installing this as well.
Debugging
- Here is the official documentation on debugging C# ↗.
- The old VSC Debugger for Unity ↗ has been deprecated; Microsoft's Unity extension for VS Code ↗ replaces it. I use
Debug.Log()(likecout) for debugging.
Begin working with Unity
Tutorials to go over yourself, after (or before) class:
- Get started with the Unity Hub
- Unity Learn tutorials: under the Level tab, select Foundational and Beginner and watch the tutorial videos.
- Unity 6.3 Manual
Problems Q&A
WebGL build configuration
When you try to run your WebGL build, you may get an error like this:

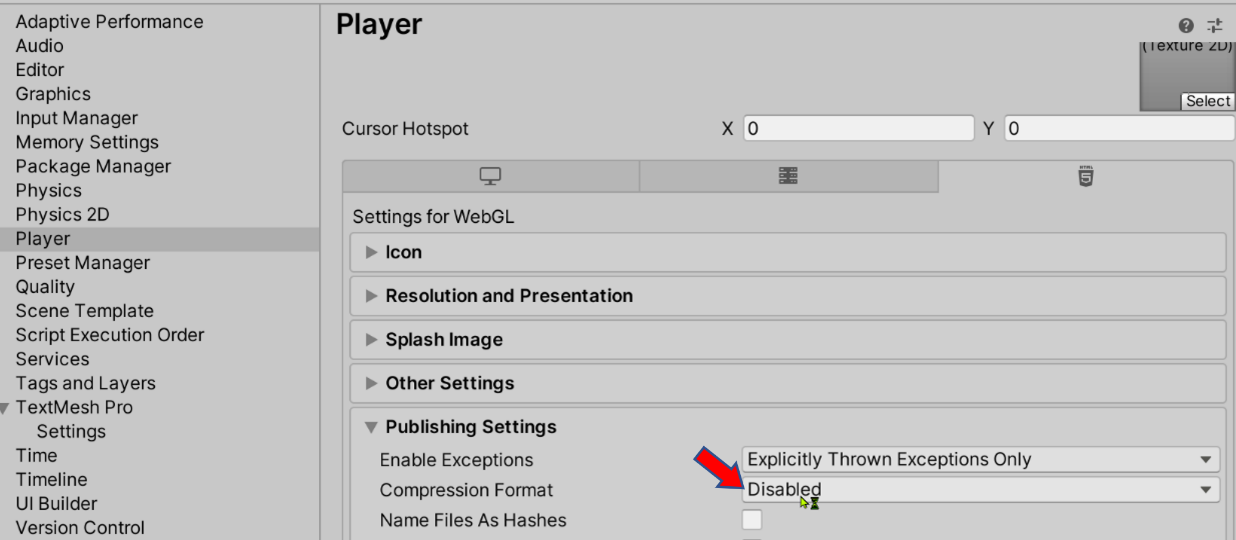
This setting solved the problem for me (see this discussion ↗; Unity's Deploy a Web application ↗ page explains the compression options). Before building:
- Open File › Build Profiles, select Web, and click Player Settings. (Older Unity versions call this window Build Settings.)
- Click Player, and under Publishing Settings find Compression Format.
- Set it to Disabled.
Missing Unity API IntelliSense
A few things may be wrong:
- Check the installed packages: open Window › Package Manager. Under Packages: Unity Registry, scroll down and make sure Visual Studio Editor is installed. It supports both Visual Studio and VS Code. (The older “Visual Studio Code Editor” package is deprecated; you don't need it.)
- Visual Studio Code: if you use VSC, make sure to install the Unity extension from Microsoft ↗, and follow through with updating the Package Manager.
- Default editor setting: in Edit › Preferences › External Tools › External Script Editor, make sure this is set to your IDE.
- First time opening the project: choose Assets › Open C# Project.
UI option missing from the Create menu
You need to add the UnityEngine.UI package: open Window › Package Manager, choose Packages: Unity Registry, and search for Unity UI. Once it's installed, the UI items appear in the Create menu under UI (Canvas).